Recipes

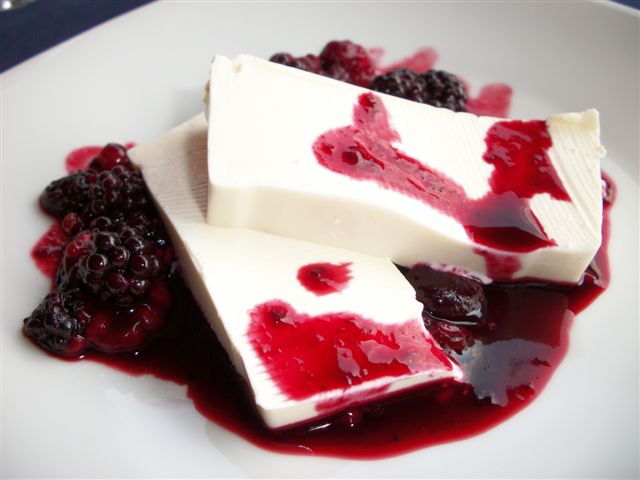
Panna Cotta with Raspberry Sauce

ISA’S “PANNA COTTA WITH RASPBERRY SAUCE”

“Panna cotta” is a nothern Italian sweet (the origin is from Piedmont) that became popular all over Italy. Literally panna cotta means “cooked cream” in Italian, even though it is barely cooked at all! This is the most inexpensive, easy, unbelieveably fast dessert you can do and it looks like it belongs in one of those fancy restaurants. It is a very impressive and elegant dessert, especially when served on fancy dessert dishes and with small dessert cookies! Surprise your friends and relatives with this creamy, rich, rounded flavour dessert as I have over many years!

INGREDIENTS (FOR 4 PEOPLE)

For the cream:
500 ml (17 oz) heavy cream
120 g (½ cup) sugar
4 gelatin sheets (2 g each) or 1 (.25 ounce) envelope unflavored gelatin
1 vanilla bean (better) or 1 teaspoon of vanilla extract

For the raspberry sauce:
2 cups raspberries
1/3 cup sugar
2 tablespoons water

PREPARATION

Soften the gelatin sheets in cold water for about 10 minutes, or if using the envelope, sprinkle the gelatin over a little of the cream to dissolve. With a sharp knife, cut vanilla bean lengthwise in half and carefully scrape out and discard the seeds. Bring the cream, sugar, and the vanilla pod to a simmer, without boiling! Turn off the heat, cover the pan and leave to infuse for 5 minutes.

Throw away the vanilla bean, add the gelatin (well squeezed if using the sheets) and allow to dissolve, it will take only a few seconds. Keep stirring the hot liquid. Pour into one rectangular cake mold (nonstick, if possible) or divide it into individual molds (rinse them with water before pouring!) Cool uncovered at room temperature. When cool, refrigerate to solidify for at least 5 hours before serving.

Remove panna cotta from refrigerator. Dip the bottoms of the molds into a warm water bath for about 20 seconds. To unmold it, run tip of knife around edges. Turn out the panna cotta forms onto serving plates.

Spoon raspberry sauce around each panna cotta and sprinkle with raspberries.

Raspberry sauce:
Combine raspberries, sugar and lemon juice in a saucepan. Cook until raspberries are broken down. It will take about 10 minutes. Remove from heat . Pour theh sauce over the panna cotta and garnish with some fresh berries.

TIPS

Panna cotta is about nothing but texture. The cream must be robust enough to unmold, but delicate enough to shiver on the plate. This recipe is just right to get that feel.

The nice thing about panna cotta is that it easy to modify. You can prepare a variety of sauces to suit your taste. You can serve this dessert with a caramel, mocha, or chocolate sauce, but my favourite one is this raspberry sauce garnished with some fresh fruits.

Tuscan Farmer’s Cantucci

TUSCAN FARMER’S CANTUCCI

A fun and easy recipe that you can make is this one for cantucci. In some countries these are called “biscotti” but in Italian, the word “biscotti” simply means “cookie”. This particular type of cookie is so delicious dipped into tea, coffee, hot milk or hot chocolate, and in Tuscany is enjoyed when dipped in Vin Santo, a delicious sweet dessert wine. When you come to Cretaiole you must try these with Luciano’s (my father-in-law) artisanal Vin Santo, which he will be delighted to serve to you!

INGREDIENTS

280 g flour (2 cups)
130 g sugar (2/3 cup)
1 tsp baking powder
Pinch of salt
3 eggs and 1 more to make an egg wash
1 tsp vanilla
75 g (3/4 cup) whole almonds

PREPARATION

In a bowl combine the first four ingredients: flour, sugar, baking powder, and salt.
Beat lightly together the vanilla and eggs, and then add them to the flour mixture. Mix thoroughly with a spoon.

Knead with your hands, briefly, first in the bowl and then on a lightly floured surface until it is smooth dough. Let the dough sit for about 2 minutes.

Preheat over to 173 degrees C (350 degrees F).

Spread out the dough to 1 cm (3/8 inch) thick. Spread the almonds on top of the dough, evenly. Fold the dough onto itself several times and knead briefly until the almonds are distributed evenly throughout the dough.

Divide the dough into three pieces and form them into 3 cylinders approximately 30 cm (12 in) in length. Place these on a cookie pan covered with parchment paper and flatten them a little.

Make an egg wash and brush onto the dough. Bake for 30 minutes (approximately) until golden brown but still a soft dough.

Remove them from the oven and slice them diagonally, approximately 1 cm (3/8 in) in width. Bake the slices for another 15 minutes.

TIP

Store in an airtight container and they will be delicious for weeks.

“Frittatina with Fresh Herbs”

LINA’S “FRITTATINA WITH FRESH HERBS”
(MY HUSBAND’S OLD GRANDMA)

This dish was a very typical (and cheap!) second dish within the family, as they had everything available: eggs from the chicken coop, onions and herbs from the garden, ricotta cheese made from the milk of their sheep… and extra virgin oil of course, the king of all the ingredients! Frittata is healthy, tasty and easy-to-make! Try it! Nowadays frittata is very often eaten together with cold cuts and meats (prosciutto, salame, etc.)

INGREDIENTS (FOR 4 PEOPLE)

6 whole eggs
1 large white or golden onion (or 2 medium sized ones)
150 g (5 oz) sheep or cow ricotta cheese
1–2 zucchinis
A bunch of chives
Salt
Extra virgin olive oil

PREPARATION

Cut the zucchini and the onions into thin slices and put them in a large frying pan together with abundant olive oil and cook over medium heat. Use a fork to check when they are soft and well cooked (about 15 minutes), then increase the heat for a few minutes until they are golden.

Beat the eggs and add salt to them. As a last step, add ricotta cheese to the egg mix and stir well, until cheese is well mixed. Pour the mix in the pan on top of the zucchini-onion-oil , spread all over thinly chopped chive and set at the lowest flame, cover with a lid, and cook for about 10 minutes.

The frittata will slowly magically “rise” in the pan becoming incredibly soft . It will be ready when you will see a solid consistency all over.

if you like a spicy taste, you can add a tiny little bit of peperoncino powder (chili pepper) in the egg mix!

TIPS

The magic thing about frittata is that you can add (almost) anything that you want: if you have cheese, broccoli, pasta left over from dinner the night before, cut it into bite size pieces and include it! Vegetables are always welcome for flavour, color, and crunch. Textures should vary within the frittata. Herbs can be added, whether fresh or dried. Different cheeses will also effect the flavors of your frittata. Spinach, walnuts, and Gorgonzola create a sophisticated frittata. Have fun! Experiment! (That’s not a Tuscan tip… Tuscan people are very traditional in their way of cooking!)

Frittatas are perfect served with a fresh salad (cherry tomatoes, rucola, extra virgin olive oil, and balsamic vinegar) and a glass of chilled white wine.

Burro e Salvia

“BURRO E SALVIA” (SAGE AND BUTTER SAUCE)

This super–quick sauce is ideal with gnocchi and any short pasta such as penne, conchiglie, mezze maniche, …well actually, it is also very good on tagliatelle!!

INGREDIENTS (FOR 4 PEOPLE)

200g (7 oz) butter
Bunch of fresh sage leaves, 4-8 leaves per person, according to size of leaf
¼ – ½ cup grated parmesan cheese, according to your taste
Freshly ground black pepper

PREPARATION

Wash and dry the sage leaves. Melt the butter in a saucepan and add the sage. Cook gently, taking care not to let the butter burn too long (but the sage must fry for a few minutes!).

Pour the butter sauce over the pasta which has been cooked in salted water, add the parmesan cheese, and stir together well with some freshly grated parmesan. Remove from the heat and stir in a good helping of grated Parmesan cheese. The sauce should look smooth and creamy. Grind black pepper over the top when serving.

TIP

This really simple sauce is the best one for gnocchi and ravioli with ricotta and spinach filling! You will LOVE it!

Liliana’s “Ragù”

LILIANA’S “RAGÙ” (THE SAUCE OF MY MOTHER–IN–LAW)

“Ragù, ragù, se non ci fossi tu!” (Ragù, ragù, if you were not there…) well, we should invent you!
Ragù is the most typical, renowned, popular Italian meat sauce. It’s made everywhere, from the North to the South, but each region, each town and village (and each person!!) has its own version. In Tuscany it is used many ways: served on a small bread slice (like a crostino) to start the meal, or stirred into penne pasta with a dusting of parmesan cheese, or layered with béchamel sauce and pasta (lasagne) for a hearty lunch.

Here you get the wonderful, unique (and, to me, the best!) recipe from my mother–in–law, Liliana, a superb, traditional, Tuscan home cook!

INGREDIENTS (FOR 4 PEOPLE)

1 red onion, finely chopped
1 carrot, peeled and finely chopped
1 celery stalk, finely chopped

300 g (10 oz) ground beef
300 g (10 oz) ground pork
1 fresh pork sausage, skinned (if available)
1 can (14-15 oz) Italian plum tomatoes

1 glass (8 oz) of red wine
Extra virgin olive oil
Pinch of sugar
Salt
Freshly ground black pepper

PREPARATION

Finely chop the carrot, onion, and celery and place in a pot and sautè at medium flame in abundant extra virgin olive oil until it starts to almost caramelize. It sweetens the carrots and onions and gives the sauce a really special flavour!

Then, add the fresh sausage (removing the skin) breaking it up in the cooked vegetables and brown thoroughly. Add the ground beef and pork, raise the heat, and stir until browned.

Splash with wine and let the wine evaporate. Add the tomatoes. Salt and pepper to taste. Lower the heat to the minimum and let cook covered for 5 hours, stirring occasionally.

Cook the pasta in salted water until al dente. Drain the pasta very well, and then put it back in the pan. Add the pasta sauce and stir to let the sauce flavor the pasta. Serve freshly grated parmesan on the side!

TIP

The real secret of a good ragù is the extremely slow, low heat cooking, for at least 4 hours, but 5-6 hours will be even better! And your home will just smell fragrant and delicious for the whole time!

You can also add porcini mushrooms or some thinly sliced prosciutto crudo (raw ham) to give a richer taste.

Ragù freezes very well, so make a large quantity!

Brodo

“BRODO” (MEAT BROTH)

Broth is served by itself to prepare the stomach for a larger meal; with fresh pasta such as tagliatini or tortellini (little ravioli); as an ingredient for other recipes such as risotto or for yummy soups (chickpea soup, onion soup, etc); or as almost a medicine to fight a bad cold or an upset stomach.

INGREDIENTS (FOR 4 PEOPLE)

500g (1 lb) beef
Half a chicken, skin removed
1 carrot, peeled and chopped
1 stalk of celery, chopped
1 medium onion, chopped
1 ripe tomato, chopped
2 litres (8.5 cups) cold water
Fresh Italian (flat–leafed) parsley, 3–4 stems
Salt to taste (try 1–2 teaspoons, taste before adding too much)

PREPARATION

Cut the beef and chicken into pieces. Put into a large saucepan with the chopped vegetables. Add two litres (8.5 cups) of cold water, the salt, and the parsley (tied into a bunch for easy removal later). Bring to the boiling point and then turn down the heat and let it simmer for about 1 hour and 30 min. Remove the meat and strain the liquid. If you wish to remove all the grease, it should be left to cool completely first and then put in the refrigerator. The fat will float to the surface, harden, and will be easy to remove.

Pici

PICI “MORICCIANI STYLE”

Pici is the local pasta made only in the Val d’Orcia. Every woman has her own way of making the dough–there are as many ways to combine ingredients (with eggs, without eggs, etc.) as there are cooks! This is why we call this recipe “Moricciani Style” because it is the way we make it. We like our pici with Liliana’s “Ragù” (the recipe is available in the “Broth and Sauces” section).

INGREDIENTS (FOR 2-3 PEOPLE)

1 kg unbleached all-purpose flour*
1 whole egg
1 glass of water (ca. 200 ml) at room temperature
1 cup all purpose flour (to keep the pici separated while they are drying)

If you have taken the pici-making class at Cretaiole, you know that it is important to adjust the water according to the way the dough feels. The size of the eggs, the amount of humidity in the air, etc., will make it necessary for you to use more or less water to make the dough right. So, please take these measurements as approximate amounts.

*See tip below for gluten-free flour

PREPARATION

Pour 1 kg flour on a wood or rough marble counter and form a well in the center. Add the egg to the center of the well and beat with a fork. Add the water and mix with the fork while not letting the water escape; when the ingredients come together start using your hand to mix them until the dough forms. Work together until smooth and homogeneous. Knead dough for 5-10 minutes, adding a little more flour if necessary to prevent sticking.

The dough at the end of the work must be quite solid, but elastic, not sticky. Note: if it is still too sticky add some more flour, if it is too hard you can’t add more water!

Brush top of dough with some olive oil to prevent skin from forming, and cover with a cloth. Let rest for 10 minutes.

How to “roll” the “pici”:
To make “Pici” is an art, but with some training you’ll be able to get good results. The “picio” must have the shape of an irregular “spaghetto”, but it must be thicker than regular spaghetti. A “picio” can be up to 2 meters long!

It is preferable to work on a rough surface (or even a silicon pastry mat–they work great!) which has to be completely clean and with no flour! Put also a drop of olive oil in the palm of your hands before starting, it will be easier for you to roll the pici.

First roll the dough out on a lightly floured counter until it is 1/16” thick. Cut into 1/8” wide pieces. The left hand must keep the left end of the piece while the right hand is rolling. Always roll the pici under the palm, not under the fingers! The right hand must move on the picio from the right to the left.

When the picio is done, hang in loops over your hand and put it into the flour to prevent them from sticking and place on prepared baking sheets or platters. Repeat with remaining dough.

Bring a large pot of water to a boil; add a handful of salt. Cook pasta until al dente, about 5 minutes. Drain.

TIPS

If you need a gluten-free pasta, use this same recipe but try it with Jules Gluten Free Flour (www.julesglutenfree.com). This tip comes from one of our guests from the United States. She simply substituted the flour with this particular gluten-free flour. Other brands may work as well. Try it and let me know about the results!

Risotto alla Milanese

ISA’S “RISOTTO ALLA MILANESE”

“The Risotto alla Milanese” is a typical dish of the Milanese cooking tradition. It dates back to 1574 when a glass artisan named Zafferano added some saffron that he used for coloring his paints to his risotto for his daughter’s wedding. Saffron comes from the tiny purple crocus flowers that produce three stigmas per flower that are hand picked and dried. It takes 14,000 of these delicate stigmas to produce one ounce of saffron! It is best to use the dried pistils…but if you can’t find them… a good (and not expensive!) substitute is the saffron powder.

Arborio rice comes from Italy. Its short, fat grains have a hard starchy center and a soft starchy shell. So it makes sense that, when cooked, the soft shell produces creaminess while the center remains crunchy.

The best arborio rice is a premium Carnaroli rice imported from Italy. It’s hard to find but worth the search!

INGREDIENTS (FOR 4 PEOPLE)

400 g (14 oz) arborio rice, Carnaroli or Vialone Nano
60 g (2 oz) butter
50 g (1.7 oz) beef marrow (get this from your butcher), minced
1 small white onion, thinly sliced
¾ glass of white, dry, non sparkling wine (must be warmed up)
0.5 g (0.01 oz) of saffron pistils or 2 packets of saffron powder
80 g (3 oz) grated Parmesan cheese
1.5 liter (6.5 cups) good meat broth, boiling hot (use my broth recipe below!)
Salt to taste

PREPARATION

In a casserole, simmer the finely sliced onion and the beef marrow in half the butter over low flame for about 10 minutes; the onion should become translucent but not brown. Add the rice and sauté the rice over a moderate flame for 7-8 minutes, stirring constantly and let it lightly toast.

Stir in the warmed wine and cook, stirring, until it has completely evaporated. Then stir in one ladle of the hot broth, and once most of it has been absorbed add another, stirring until it absorbed. Continue in this fashion, adding liquid until the rice is almost at the al dente stage. It is very important not to add the broth all together, but stirring constantly, adding one ladle at the time in order to release the rice’s starch.

When you get to half of the cooking, stir in the saffron (previously diluted in one ladle of warm broth), add salt if needed, and finish the cooking (altogether it will take 18–20 minutes), then turn off the heat. Add the remaining butter, and the Parmesan cheese. Stir for about 20 seconds, cover and let sit for a couple of minutes before serving.

You can serve it either as a bed for Ossobuco alla Milanese (see recipe below) or as a first course, with more Parmesan cheese on the side.

TIPS

If you serve Risotto as a first dish you can add ultra thin gold leaves on top, it makes a precious and raffinata presentation!

“Ossobuco alla Milanese”

ISA’S “OSSOBUCO ALLA MILANESE”
(MILANESE VEAL SHANK)

Hmmmm, my mouth starts to water just to think of it!

Ossobuco is a Milanese dish and I have always been really good with this dish. The name means “bone with a hole” or “hollowed bone”. This refers to the veal shank bone with a large and tasty marrow filling. At the end, this dish is garnished with a “cremolata”, consisting of a mixture of fresh parsley, garlic, anchovies and grated lemon peel.

Ossobuco’s traditional partner is Risotto alla Milanese (see recipe above). A truly superb dish.

INGREDIENTS (FOR 4 PEOPLE)

For the meat:
4 veal shanks, 250-300 g (8-10 oz) each
1 small carrot
1 celery stalk
1 small onion
All-purpose flour, for dredging
50 g (2 oz) butter
50 g (4 tablespoons) extra virgin olive oil
2 cups of meat broth (see recipe above)
¾ cup dry white wine (nonsparkling)
5 cm (1 tablespoon)tomato paste (concentrate)
Salt, to taste
White pepper, to taste


For the cremolata:
1 tablespoon grated lemon zest
1 clove garlic, minced
2 tablespoons fresh parsley, minced
Chopped anchovies (if you like them)

PREPARATION

First, score the tough membrane that encircles the meat at least in 4–5 different places, to prevent the edge from rolling up and preventing it from remaining flat while cooking. Then dredge the veal shanks in the flour.

Melt the butter and olive oil in a large skillet (best to use a copper or aluminium one) over medium to medium–high heat. Finely dice the onion, carrot and celery, add it in the pan and saute until golden. Take the vegetables out of the pan and add the veal, and brown on all sides. Season with salt and pepper, pour in the wine and let it evaporate. Dilute the tomato paste into the warm broth and add it to the meat together with the cooked vegetables.

Cover, and simmer over low heat for 1½ hours, basting the veal every 15 minutes or so. If necessary, add a little bit of broth while cooking.

While the ossobuco is braising, prepare the “cremolata”: In a small bowl, mix together the minced parsley, the garlic, the lemon zest, and the anchovies. Mix into the veal just before finishing the cooking.

TIPS

Definitely serve with risotto (I highly recommend Risotto alla Milanese!), but it is also excellent with polenta or peas and white rice!

Panzanella

“PANZANELLA” DI ZIA FLORA (MY HUSBAND’S AUNT)

“Panzanella” is a Tuscan rustic poor bread salad, perfect in the summertime, and it has its origin in the old farmer’s traditions. It’s a very simple and easy–to–make dish that doesn’t require any cooking and because of that, in the past, was eaten on the fields where no heating was possible. Panzanella, a glass of wine…and back to work!

INGREDIENTS (FOR 4 PEOPLE)

500 g (1 lb) of one–day–old bread
15 leaves of fresh basil
1 fresh cucumber
1 red onion
2 ripe tomatoes
Fresh lettuce
Salt
Freshly ground black pepper
Extra virgin olive oil

PREPARATION

Remove the crust of the bread (and feed it to the birds). Soak the bread in room–temperature water for about 30 seconds until it becomes soft, but not completely wet. Remove it from the water and squeeze it firmly between your fingers, removing as much of the water from the bread as possible. Make rough bread crumbs out of it by rubbing the bread between your hands, letting the crumbs fall into a large mixing bowl.

Add to the bread crumbs the peeled and thinly sliced onion, finely diced tomatoes, peeled and cubed cucumber, thinly sliced lettuce, and shredded basil leaves (tearing with your fingers, not by cutting it with a knife).

Add salt, pepper, and a good amount of a good quality, extra virgin olive oil and stir well. Put in the refrigerator for 1 hour. Before serving add more olive oil.

TIPS

The authentic original recipe is very simple. You can add chopped boiled eggs, yellow and red bell peppers, anchovies, tuna, celery, and some people like to add red wine vinegar. It won’t be typically Tuscan any longer but still delicious!!

Organizza il tuo viaggio in Toscana
Chiama Isabella!

Tel. + 39 0577 665516
Cell.: +39 338-7409245
Plan Your Tuscan Stay
Call Isabella Now!